The Program MulTex 2.0

Inhalt:
Short Description
The program MulTex 2.0 contains not simply the texture method No. "n plus 1"
intending to calculate the orientation density functions of multi-phase samples
from measured diffraction pole figures while taking into account coincidences.
To find correlations with the parameters of texture-modifying processes
(technologies, geophysical processes),
these usually have to be interpreted geometrically,
i.e. in terms of preferred orientations and axes, scattering widths and volume
fractions (texture components) after calculation.
MulTex 2.0 combines the two steps.
Since only relevant parameters and correlations shall be included in the interpretation,
the interactive approach in the component search that is practiced here is not only
reasonable but even necessary.
MulTex 2.0 has the following performance parameters:
- Operating system: Windows 95/98, Windows NT.
- MulTex incorporates a consistent database management.
- Simultaneously, any number of samples, crystal structures,
measurement grids and pole figures is managed,
i.e. file management by folders or directories is not necessary.
- Pole figures can be used in small circle measurement grids of any
density (regular or thinned).
- Pole figures, including such of different samples,
can be represented on any number of freely scaleable worksheets.
Rectangular windows of any size can be defined for copying (to the clipboard),
printing or saving the figures in BMP or WMF format.
- Pole figures can be represented alternatively with up to 200 isolines or iso-areas.
- In addition to the stereographic projection,
the pole figures can also be represented in equal area mode or orthographically (spatially).
- Data from NJC Rayflex files (SEIFERT) can be accepted by pressing a button.
- MulTex 2.0 allows texture determination even in multi-phase systems (Multi-Texture).
According to our experience, the textures of up to three crystalline phase
fractions (including such with low crystal symmetry) can be determined simultaneously
if there is a sufficient number of pole figure data.
- Any number of Bragg reflections (coincidences) superimposed in a pole figure
can be handled, however, in the normal case of "soft" textures it should not be
greater than three.
- The preferred orientations and directions of the texture components are first
estimated interactively (by mouse click) and then improved and/or calculated numerically
by least squares fit together with the other component or pole figure parameters.
Alternatively, one component or several components can be fitted.
Any number of texture components is possible.
- The component fit is available for all known crystal symmetries.
The possible sample symmetries are given by the point groups Cn and Dn.
- Graphical representation of the texture (ODF) by Euler sections is possible
for any crystal or sample symmetry.
If any wishes are left unfulfilled, please contact me under helming@t-online.de.
Since Jan 2002 the Program MulTex 2.1 is distributed by
Bruker-AXS /
www.bruker-axs.com.
Content
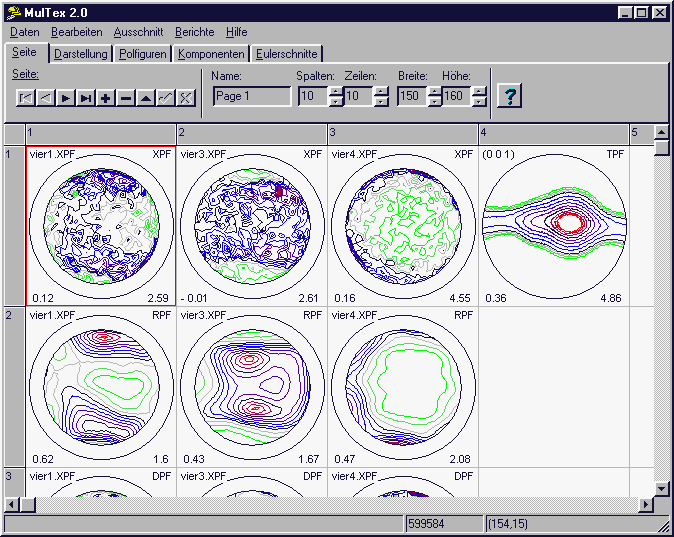
The MulTex main form comprises the following four fields:
Menu Bar
At the top edge there is the Menu bar with the entries:
Data: Lattices, Samples, Components, Grids, Exp. Pole Figures, Rayflex; Exit
By this menu items, the forms for the treatment of the various MulTex data are accessed.
Edit: Page, Display, Pole Figures, Components, Euler Sections;
The registers in the tool folder are called by these menu items.
Section: Print, Clipboard, Save (*.wmf), Delete, Redraw;
These functions relate to all images in the marked section.
Report: PF Report, ODF Report
These commands generate database reports on texture components and pole figures
of the current sample.
Help: Info..., Help.
Tool Folder
Under the menu bar there are the registers of the tool folder: Page Register, Display Register,
Pole Figures Register, Components Register, Euler Sections Register,
Image Field
In the image field, individual images can be selected for editing by clicking with the
left mouse key. The selected image is marked by a red frame.
If the Shift key remains pressed while dragging the mouse, a rectangular section
can be marked; the corresponding image cells receive a blue frame.
The local image menu is opened by clicking (right mouse key!) of an image
cell in the image field; it contains the entries Delete (only current image),
Designation (for changing the image designation) and Iso-Colors.
By Store the current iso-colors (normed numeric values) are stored; by Replace,
they can be transferred to any other selected image cells.
Status Bar
At the bottom edge of the main form there is the status bar displaying various
information and tips.
Content
The MulTex Data Model
A database manages the data units as tables and relationships.
Tables are organized two-dimensional in lines (also called data sets) and columns.
All data sets of a database have the same structure.
The place where a column and a data set intersect is called a field.
A widely used form of data model representation is the Entity-Relationship Model
("ER Model").
An entity is an object of the real world that can be characterized by a group
of information elements (a data set).
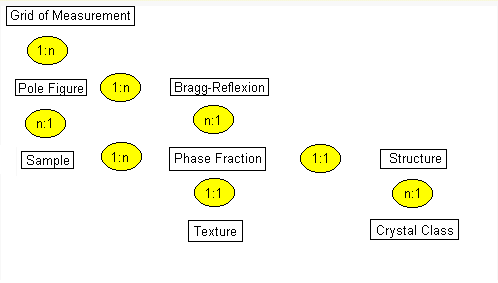
MulTex describes the following entities:
- Crystal Structure
- Sample, Phase Fraction, Texture
- Measurement Grid, Measurement Circle
- Pole Figure, Coincidence
by corresponding tables. The relationships are shown by the ER model:
For instance, there is a (1:n) relationship between the grid of measurement and
the pole figure, i.e. for each data set of the Measurement
Grid table there are one or several Pole Figure data sets.
Each pole figure is measured for a sample (n:1) and can contain several BRAGG
reflections (1:n).
In turn, these can by produced by various phase fractions present in the sample (1:n).
Each (crystalline) phase fraction has a crystal structure (1:1).
All crystal structures can uniquely be assigned to 32 crystal classes (point groups).
Each phase fraction has a texture quantitatively described by the orientation
density function (ODF).
This rather complex data structure is necessary to allow pole-figure-based texture
determination also for multi-phase systems (Multi-Texture).
Since the described relationships are solidly "installed" in MulTex,
users will not have to take care of them themselves.
Content
Example: Component Fit
(part of the help file)
1. Activate the Components Register.
The cursor is now shown as a crosshair on top of the image field.
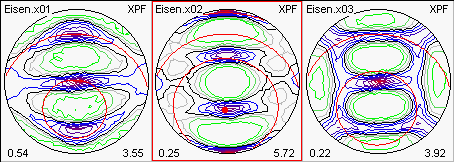
Draw the pole figures of the sample Iron (Example 3), whose texture shall be determined,
in a horizontal line.
For component determination, one phase fraction and at least one related coincidence
must be described in each pole figure.
By clicking (left mouse key) an intensity maximum in any of the pole figures
(here, the (011) PF-Eisen.x02) the pole figure path is defined at the beginning.
The component navigator disappears:
A pole figure path hp||yp describes the set of all orientations for which
the normal hp the lattice plane (hkl) is parallel to the fixed sample direction
yp, here represented by the red dot.
The orientations of the path project the equivalent symmetric poles of any group of lattice planes (hkl) on concentric circles, whose angular radii are preset in terms of crystallography.
In the cubic iron crystal there are 12 equivalent symmetric (011) directions
(edge centers of the cube) whose totality forms the star {011}.
The represented pole figure path is formed by rotating the star {011} around
the direction (011) fixed parallel to yp.
The circles displayed in the same pole figure at the angular distances
60°, 90°, 120° and 180° (the latter is distorted into a point on the lower,
invisible pole sphere) are generated by the other {011} directions.
By analogy, the circles in the other pole figures are generated by rotating the
stars {111} and {001} around the fixed direction (011).
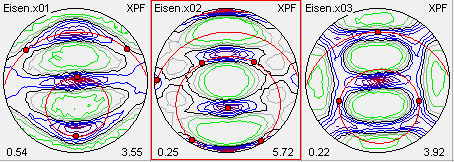
2. The preferred orientation of a texture component is defined by
selecting an intensity maximum on the path in any pole figure by clicking
with the left mouse key while the Alt key is kept pressed.
All stars are now fixed; their directions shall point to pole figure areas with
higher intensity, as is shown in the figure:
The component navigator reappears and allows to add the component after the scattering
width b has been estimated.
Prior to this, all other orientations of the path can be set by the button Rotate stars.
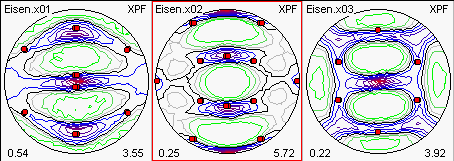
3.After the component has been added and the orientation and the stars
{111}, {011} and {001} have been fixed, these are multiplied according to the
given sample symmetry (orthorhombic in the example).
For an orthorhombic sample symmetry (order: 2, bilateral), multiplication
is effected by a 180°-rotation of the stars (or the crystal lattice) around the
X,Y or Z axis:
4. After the interactive estimation of the component parameters on the screen,
these can be calculated numerically (refined).
This is done by the button Least-Squares-Fit.
Any number of steps can be selected; it is possible to refine all
components simultaneously (one arrow) or just the current component (two arrows).
Refinement is carried out aiming at as good an agreement between experimental and
recalculated pole figures as possible.
After the optimization of the first texture components, it makes therefore sense
to also represent the recalculated pole figures determined from previous
components for comparison (Pole Figures Register).
To find further components, it is better to display the difference pole figures
(difference between experimental and recalculated pole figures) since these
immediately represent the texture fraction not yet interpreted by components.
The different pole figure types are characterized by XPF, RPF and DPF in the top-left
illustration:
Content